

SOLUTIONS E-APP GUIDE
-
From your dashboard, click on "IGO E-APP LAUNCH" on the top right.
-
NEXT, sign in to your pipeline E-App portal.

1

2

-
Click on "START NEW CASE" for a new application.
-
Click on "VIEW MY CASES" to view or complete an incomplete or completed application.

1
2
3
4

5
-
FIRST, enter the applicant's general information. You can leave "CASE DESCRIPTION" blank.
-
SECOND, click the drop down to select the resident State of the applicant.
-
THIRD, click the drop down to select Product Type, and then select "FINAL EXPENSE".
-
FOURTH, click on "FIND AVAILABLE PRODUCTS".
-
FIFTH, click "SELECT" for "SOLUTIONS FINAL EXPENSE".

1
1
2
-
FIRST, confirm the applicant's date of birth is correct and that the applicant has NOT been diagnosed with those certain conditions.
-
SECOND, click "NEXT".
1
2
1
1
1
1
3
-
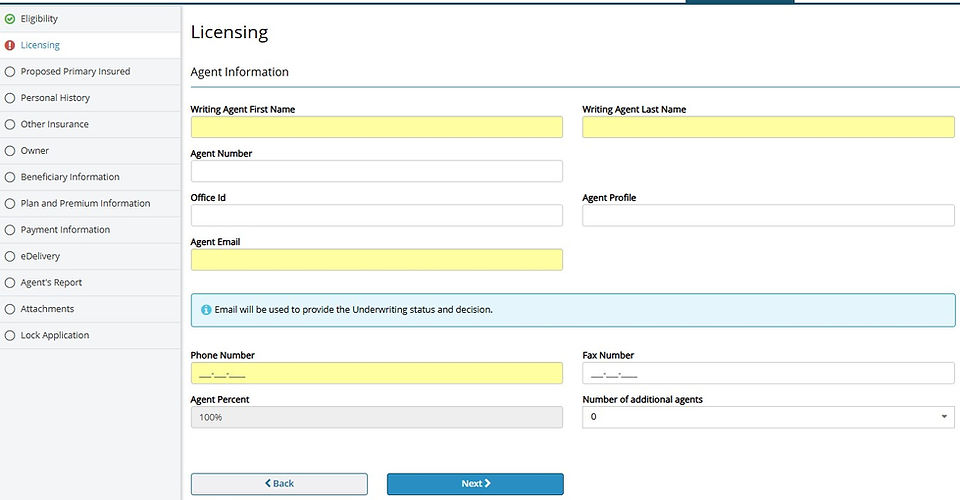
FIRST, enter your name, agent number, phone number, and email. Leave "Office ID", "Agent Profile" and "Fax Number" blank.
-
SECOND, if there will not be a commission split, leave "NUMBER OF ADDITIONAL AGENTS" at 0. If there will be a commission / agent split on this application, both percentages must equal to 100% combined. For example, 50%/50%, 75%/25%, 60%/40%.
-
THIRD, click "NEXT".
-
FIRST, enter the insured's general information.
-
SECOND, click "RETRIEVE CUSTOMER INFORMATION". You may have to click twice.
-
THIRD, continue to enter general information. If the applicant's information was able to be retrieved, you will see their social pre-populated. Confirm their last four is correct just in case. If correction to social is needed, click on the check box to the right that says "CLEAR SSN".
-
IMPORTANT: For "EMAIL" and "PHONE", the drop down will have a list of emails and numbers that the applicant has used in the past. If you do not see their current email or phone number, click "ENTER MY OWN" in order to be able to enter an email or phone# not in the list.
-
FOURTH, click "VALIDATE PRIMARY INSURED". You may have to click twice you see a green box that says "SUCCESS".
-
FIFTH, click "NEXT".

1
2

3
3
3
4
5

3
5

1

1

1
2
-
FIRST, enter the insured's personal / medical history.
-
SECOND, click "NEXT".

-
Enter information regarding existing insurance if applicable, then click "NEXT".

-
To keep it simple, try to keep the insured and owner the same. However sometimes someone may want coverage on a loved one (Child getting a policy on the parent to cover funeral expenses for example).
-
FIRST, click "CLICK HERE TO ADD" to add a beneficiary. IMPORTANT: Beneficiary must be 18 years of age or over.
-
SECOND, fill in the Beneficiary's name, relation, date of birth and percentage of death benefit. Social is NOT required as long as you have a date of birth. If there are more than one beneficiary, the share percentage with all combined must equal 100%. For example, if there are two, then the percentage for both should be something like 50/50 or 60/40. If three, 34/33/33. Same applies to Contingent. You can leave the address blank.
-
THIRD, click "SAVE".
-
FOURTH, when all beneficiaries have been entered, click on "NEXT".
-
NOTE: A "Contingent" is a back up beneficiary if the primary cannot receive the death benefit. It is not mandatory to add a contingent. A contingent can be added later by the applicant.

1
4

2
3

-
FIRST, click dropdown for "RISK CLASS". Risk classes are "PREFERRED", "STANDARD" and "GRADED". if you did proper underwriting, you should know which class the client may qualify for, but if unsure, choose "STANDARD" and make sure that you accept a modified rate just in case. For risk class / policy specifics, see "PLAN DETAILS" in "AGENT PORTAL".
-
SECOND, click dropdown for "PRODUCT NAME". Products are "10 PAY", "IMMEDIATE SOLUTION" and "EASY SOLUTION". Choose "IMMEDIATE SOLUTION" for level Preferred or Standard or choose "EASY SOLUTION" for risk class "Graded".
1
2
3
4
5
6
7
8
9
-
10 PAY is setup to where the applicant will pay their policy for 10 years after which they will be "paid up" and no longer be required to pay monthly premiums. Because the policy will be paid off in 10 years, the monthly premiums for this choice will be higher.
-
THIRD, enter the amount of coverage the applicant is applying for. Leave "Backdate to save age" alone.
-
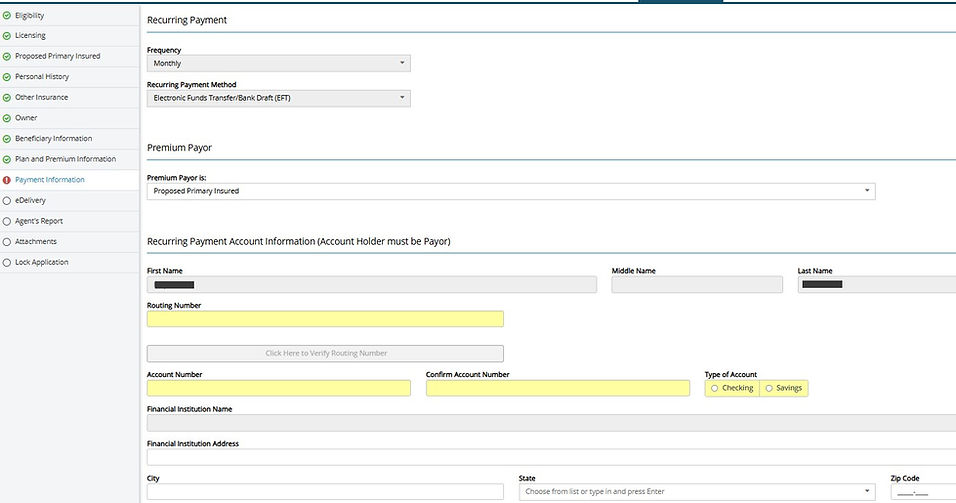
FOURTH, choose "MONTHLY" as the "PAYMENT FREQUENCY".
-
FIFTH, for "PAYMENT METHOD" choose "ELECTRONIC FUNDS TRANSFER" to use a bank account number or choose "DEBIT / CREDIT CARD" if using a debit card or the Direct Express debit card from social security. NOTE: When using a Direct Express card from social security, the applicant may need to call the card issuer to authorize the draft from Transamerica if the draft gets kicked back.
-
SIXTH, click "CLICK HERE TO CALCULATE PREMIUM".
-
SEVEN, it is recommended that you select "YES" on this question. Accepting a modified rate means that if the applicant is applying for the “Preferred” plan for example, and the medical check determines that the applicant actually qualifies for the “Standard” rating instead, Transamerica will approve the application at the Standard rating on submission. If NO, then upon medical check, if they determine that the applicant will not qualify for the Preferred Plan, they will decline the application on submission. IF you select YES, a second question may be asked. Choose “Keep the same amount of insurance”. This means that the coverage will stay the same if another rating is approved, and the premium will be raised accordingly. However, you also have the option to keep the premium the same, but the coverage amount will decrease based on the premium and rated policy.
-
EIGHT, AUTOMATIC PREMIUM LOAN. This is optional and allows the insurer to automatically withdraw funds from the policy's cash value to pay an overdue premium if the policyholder fails to make a payment on time, essentially preventing the policy from lapsing and maintaining coverage without the policyholder needing to take action; this loan is then added to the policy's outstanding loan balance with interest charges applied. If the insured passes away without repaying the loan, their beneficiary will receive the coverage amount minus any outstanding loan amounts.
-
NINE, click "NEXT"
1
2
3
3

4
5
6
5
FOR EFT (BANK ACCOUNT NUMBER)
-
FIRST, enter the applicant's routing number.
-
SECOND, click "CLICK HERE TO VERIFY ROUTING NUMBER".
-
THIRD, enter the applicant's account number and then choose the "TYPE OF ACCOUNT".
-
The address for the bank can be left blank.
-
FOURTH, to keep it simple, keep the "INITIAL PAYMENT" method the same as the Recurring and choose "YES"
-
FIFTH, choose the date that the applicant would like the premium to draft and policy to start. If they would like the premium to draft upon approval and issue, select the checkbox "CURRENT DATE"
-
SIXTH, click "NEXT".

FOR PAYMENT BY CARD
-
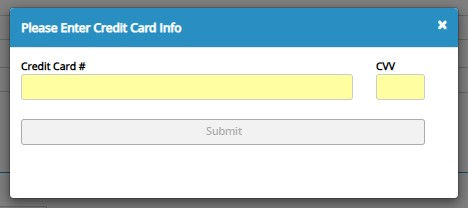
FIRST, click "CLICK HERE TO ENTER CREDIT CARD"
-
SECOND, enter applicant's Card# and the 3 digit security code, then click "SUBMIT".
-
PCI TOKEN. A PCI token will be shown in the box which is a personalized number generated for card number privacy. This number may be different from the actual card number.
-
THIRD, choose the "TYPE OF CREDIT CARD" if needed and then enter the expiration date of the card
-
FOURTH, choose the date that the applicant would like the premium to draft and policy to start. If they would like the premium to draft upon approval and issue, select the checkbox "CURRENT DATE"
-
FIFTH, click "NEXT" (Step 6 above).
1
2
3
2
3
2
4
4

1
2
3

A
C
D
-
FIRST, click "YES", otherwise the applicant will not be able to finish the applicaton.
-
SECOND, If "YES", the applicant's policy packet will be emailed to them. If "NO", the policy packet will be mailed physically.
-
THIRD, click "NEXT".
-
IF applicant would like to receive the policy packet through email, there will be a few extra steps.
-
A. You will need to click "EDELIVERY TERMS AND CONDITIONS".
-
B. Once the box populates (Not shown), click on "CLOSE".
-
C. NEXT, when the box closes, click the checkbox and confirm that the email is correct.
-
D. If email is correct, click "NEXT".

1
Leave this section blank

2
3
4

1
1
-
FIRST, complete Agent Report. Leave "CASE MANAGER CORRESPONDENCE" section blank.
-
SECOND, click "YES" here.
-
THIRD, choose how the sale was taken.
-
FOURTH, click "YES" and then enter the applicant's Driver's License or ID information. Put "STATE OF [Applicant's State]" as the issuer.
-
FIFTH, choose if the applicant would want notices sent to another person if the policy is in danger of lapsing / cancelling.
-
SIXTH, click "NEXT".

6
5
4

-
Click "NO" and then click "NEXT".
-
In some cases, IF PROMPTED, you may need to attach an ID or Driver's License here HOWEVER IN MOST CASES, IT IS NOT NEEDED.


-
FIRST, confirm all information is correct. If not, click on "CLICK HERE IF EDITS ARE REQUIRED" button to make corrections to that section.
-
SECOND, click "VALIDATE".
-
THIRD, click "NEXT".
1
1
1
2
3

1
2
-
FIRST, click "LOCK APPLICATION".
-
SECOND, click "NEXT".

4
1
3
2
-
FIRST, confirm that Signature Method is set to "COLLECT ALL CLIENT SIGNATURES ELECTRONICALLY".
-
SECOND, click "IN PERSON" if physically with the applicant OR click "EMAIL" if application is being done over the phone / virtually.
-
THIRD, set your PIN if not already prefilled with the last four of your social.
-
FOURTH, click "SEND EMAILS" and then follow the E-Signature Guide below to walk the applicant through the signature process. Make sure that you follow the script word for word and re-emphasize to the applicant to wait for your instructions before jumping ahead in order to avoid getting locked out of the signature. If the applicant gets locked out, you will need to go back to the "LOCK DATA" section button and click "UNLOCK" in order to restart the signature process again.
E-SIGNATURE GUIDE


END OF E-SIGNATURE GUIDE

-
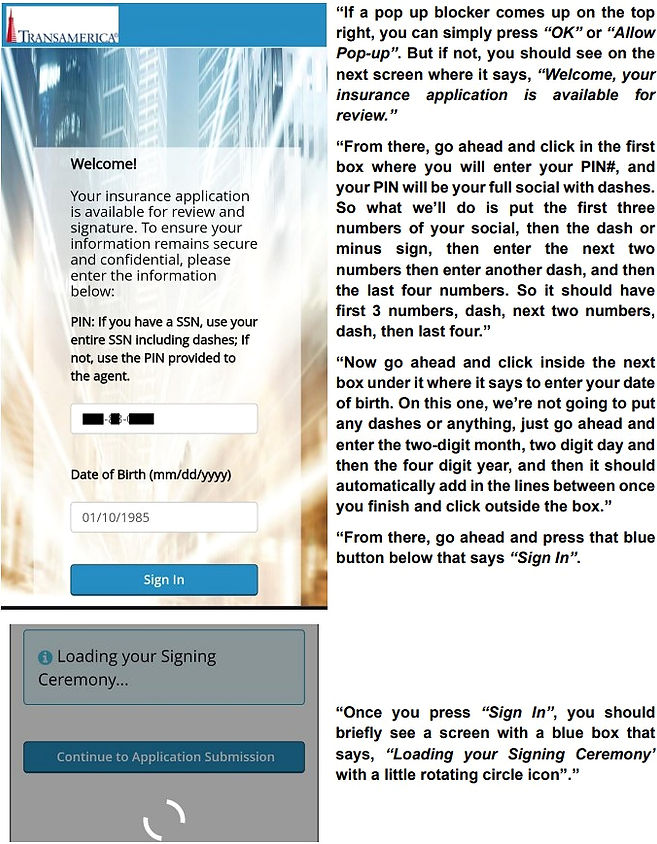
At this point, go into YOUR email, click on the message from Transamerica that says "ACTION REQUIRED", and then click the blue "ACCESS YOUR APPLICATION" button. If you do not see it, check your spam folder.

2
1
-
If a pop-up blocker comes up, click "OK".
-
FIRST, enter the PIN you set inside the white box.
-
SECOND, click "SIGN IN".

2
1
4
5

3
-
FIRST, click the checkbox.
-
SECOND, click "REVIEW YOUR APPLICATION".
-
THIRD, when the application pops up, click on "CLOSE"
-
FOURTH, click the checkbox that says "I HAVE REVIEWED THE APPLICATION.
-
FIFTH, click "I AGREE".
-
Click the yellow box that says "CLICK HERE TO SIGN".


-
Sign inside of the white box when it populates, then click "APPLY SIGNATURE".
-
You will be taken back to the application to sign in 2 or 3 more spots. Simply click on each yellow box to apply your signed signature.

-
Write down the Policy / Case Id Number for future reference.
-
Click "SUBMIT TO TRANSAMERICA".

END OF EAPP

-
If done before 5, you'll typically get the underwriting decision through email within 15 minutes but it could come in the next morning if done later in the day after business hours.
-
Pay attention to the language as sometimes it will say it has been approved "AS APPLIED" meaning that if you applied for preferred, it was approved at preferred. HOWEVER, let's say that you applied for Preferred, but it was approved at Standard, it may say that it was not approved at the level or risk class applied for of preferred, but it was approved at Standard or Graded. In this case, you will need to contact the customer to discuss if they would accept the higher rate or if they want to lower coverage to reduce the monthly premium. Once you've spoken to the client, contact Transamerica and let them know what the client wishes to do.